Hunter 54068 52 Orchard Park User Manual
Browse online or download User Manual for Fans Hunter 54068 52 Orchard Park. Hunter 54068 52 Orchard Park User Manual
- Page / 16
- Table of contents
- TROUBLESHOOTING
- BOOKMARKS
Summary of Contents
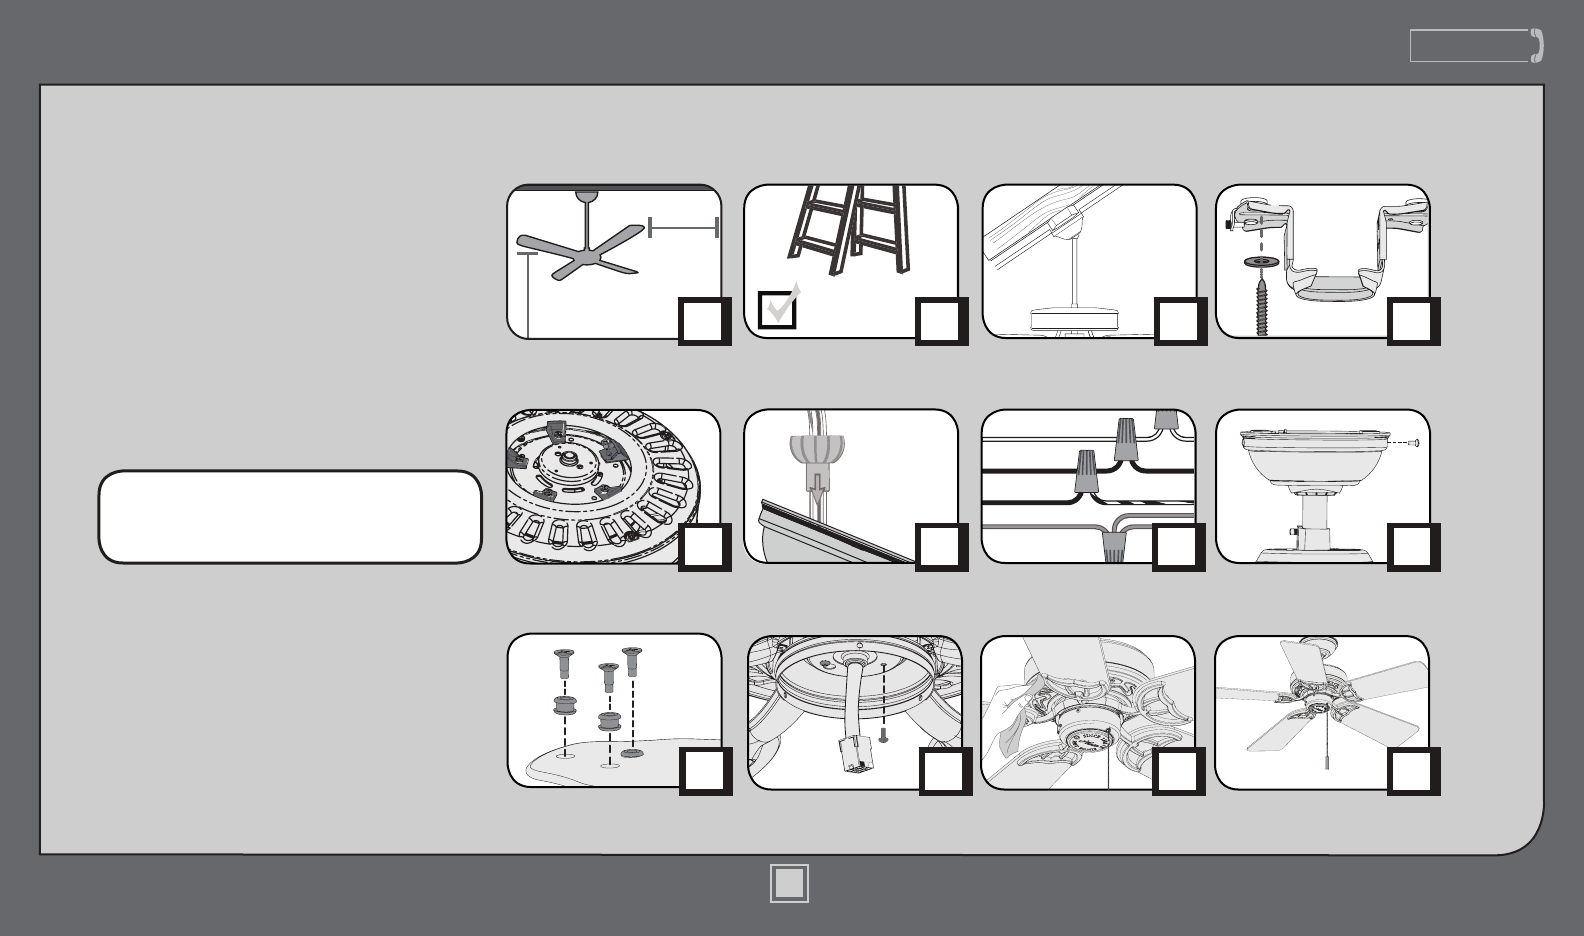
www.HunterFan.com1.888.830.1326PAGE7PAGE13PAGE10PAGE5PAGE630 inches7 feetPAGE2What to Expect with Your InstallationCeiling BracketLadderPAGE3Tools Nee
www.HunterFan.com1.888.830.1326WiringFROM FANFROM CEILING BRACKETFROM FANUsing an orange wire connector from the hardware bag, connect the 3 gr
www.HunterFan.com1.888.830.132611M3526-01 • 05/02/13 • © Hunter Fan CompanyCanopyLift the canopy into place so that the screw holes are aligned. Posit
www.HunterFan.com1.888.830.1326M3526-01 • 05/02/13 • © Hunter Fan CompanyBladesYour blades are shielded with Dust Armor® which is a nanotechnology coa
www.HunterFan.com1.888.830.1326Feed the wire plug through the center hole of the upper switch housing, then wrap keyhole slots around the screws and t
www.HunterFan.com1.888.830.1326Switch Housing (continued)Make sure the lower switch housing is securely attached to the upper switch housing. Failure
www.HunterFan.com1.888.830.1326M3526-01 • 05/02/13 • © Hunter Fan Company15Maintenance & CleaningONTurn PowerChanging the direction of air ow - m
www.HunterFan.com1.888.830.1326M3526-01 • 05/02/13 • © Hunter Fan Company16Troubleshooting Excessive wobbling• Tighten all of the blade and blade
www.HunterFan.com1.888.830.1326M3526-01 • 05/02/13 • © Hunter Fan Company1.888.830.13261.888.830.1326What to Expect with Your InstallationKnow your wi
www.HunterFan.com1.888.830.1326Tools NeededLadderPower Drill (optional)9/64” Drill Bit (optional)ScrewdriversPliers Wire StrippersIf mounting to a sup
www.HunterFan.com1.888.830.13264M3526-01 • 05/02/13 • © Hunter Fan Company1.866.268.1936If you have an angled ceiling:1. You will need a longer downro
1.888.830.1326www.HunterFan.comCeiling BracketOFFMake sure all four (4) bumpers are still attached.For angled ceilings, point opening toward peak.Refe
www.HunterFan.com1.888.830.1326Ceiling Bracket (continued)Preparation1.888.830.1326www.HunterFan.comDISCARDKEEP!Remove the shipping blocks from the mo
1.888.830.1326DownrodSlideSlide1 2 3 4 5678910Sold SeparatelyIncludedLonger Downrodfor angled ceilings or ceilings 10’ or higherShorterDownrodfor fans
KEEP!8”3/8”CUT& STRIP(not to scale)Remove the pre-installed setscrew so that the downrod can be inserted.Hand tighten the downrod (at least 4-5 fu
1.888.830.13269M3526-01 • 05/02/13 • © Hunter Fan Companywww.HunterFan.comDownrod (continued)DO NOT PICK THE FAN UP BY THE CANOPY OR WIRES. Place the
More documents for Fans Hunter 54068 52 Orchard Park

Related products and manuals for Fans Hunter 54068 52 Orchard Park
 (19 pages)
 (19 pages)
(19 pages)
(18 pages)
(18 pages)
(16 pages)
(18 pages)
(18 pages)
(17 pages)
(17 pages)
(17 pages)
(19 pages)
(19 pages)
(19 pages)
(18 pages)
(18 pages)
(16 pages)
(18 pages)
(18 pages)
(17 pages)
(17 pages)
(17 pages)
© 2020, manymanuals.com. All rights reserved. | 2.175 s |
 Manymanuals.com
 Manymanuals.de
 Manymanuals.fr
 Manymanuals.it
 Manymanuals.pl
 Manymanuals.cz
 Manymanuals.es
 Manymanuals-pt.com
Comments to this Manuals