Hunter PRO-C (PCC) User Manual
Browse online or download User Manual for Control panel Hunter PRO-C (PCC). Hunter PRO-C (PCC) User Manual
- Page / 40
- Table of contents
- TROUBLESHOOTING
- BOOKMARKS
- Irrigation Controller 1
- Table of Contents 2
- Specications 3
- Pro-C Components 4
- Pro-C Components (continued) 5
- Connecting AC Power 9
- Installing Station Modules 10
- Connecting Station Wires 11
- (optional) 12
- Connecting the Battery 12
- Master Valve 13
- Connecting a Pump Start Relay 14
- (not included) 15
- (continued) 16
- Connecting a Hunter Remote 17
- Programming the Controller 20
- Setting Program Start Times 21
- Setting Station Run Times 22
- Setting a Watering Schedule 23
- System O 25
- Manually Run a Single Station 25
- Seasonal Adjustment 25
- Station Output 27
- Transformer 27
- Accessory Plug 27
- Advanced Features 29
- Hidden Features 30
- Hidden Features (continued) 31
- Troubleshooting Guide 37
- Problem Cause Solution 38
- FCC Notice 39
- LIT-605_ENG 1/14 40
Summary of Contents
PC SeriesModular ControllerIndoor/Outdoor ModelsOwner’s Manual and Installation InstructionsPROC®Residential and Light Commercial Irrigation Controll
10Installing Station ModulesThe Pro-C controller is supplied with a factory-installed base module for up to 4 stations. Additional modules may be adde
11Connecting Station Wires1. Route valve wires between control valve location and controller.2. At valves, attach a common wire to either solenoi
12Connecting the Battery (optional) WARNING: RISK OF FIRE, EXPLOSION, AND ELECTRIC SHOCK. REPLACE BATTERY WITH CR2035 TYPE ONLY. Use of a dierent ba
13Connecting a Master Valve (optional)1Master ValveCOMP/MV234Connect either wire from Master Valve to the P/MV terminal. Connect remaining wire to the
14Connecting a Pump Start Relay (optional)1. Route a wire pair from the pump relay into the controller housing.2. Connect the pump common wire to
15Connecting a Hunter “Clik” Weather Sensor (not included)A Hunter weather sensor or other micro-switch type weather sensors can be connected to the P
16Connecting a Hunter “Clik” Weather Sensor (continued)Testing the Weather SensorThe Pro-C provides simplified testing of a rain sensor when the sens
17Connecting a Hunter Remote (not included)The Pro-C is compatible with Hunter remote controls. The SmartPort wiring harness (included with all Hunte
18Connecting a Hunter Remote (continued) NOTEAny extension of the wiring on the SmartPort® may result in an error message in the controller display a
19Connecting to the Hunter Solar Sync®The Solar Sync is a sensor system that, when connected to Hunter Pro-C, will automatically adjust your controlle
Table of ContentsIntroduction and Installation3 Specications4 Pro-C Components8 Mounting the Controller to a Wall9 Connecting AC Power10 Installi
20Setting the Current Date and Time1. Turn the dial to the DATE/TIME position.2. The current year will be flashing in the display. Use the j and k
21Setting Program Start Times1. Turn the dial to the START TIMES position.2. Press the n button to select A, B, or C.3. Use the j and k but
22Setting Station Run Times1. Turn the dial to the RUN TIMES position.2. The display will show the last program selected (A, B, or C) the station
23Setting a Watering Schedule1. Turn the dial to the WATER DAYS position.2. The display will show the last program selected (A, B, or C). You can
24Selecting Interval WateringThis feature is convenient if you want to have a more consistent watering schedule without having to worry about the day
25Options for Running Your Irrigation SystemRunAfter programming is complete, turn the dial to the RUN position to enable automatic execution of all s
26Options for Running Your Irrigation System (continued)One Touch Manual Start and AdvanceYou can also activate a program to water without using the d
27Using the Pro-C to Operate Outdoor Lighting (optional) Connecting the FX TransformerThe Pro-C is capable of operating three separate lighting trans
28Using the Pro-C to Operate Outdoor Lighting (optional) Creating a Lighting Program1. Turn the dial to the START TIMES position.2. Press and hold t
29Advanced FeaturesSet Pump/Master Valve OperationThe default is for all stations to have the master valve/pump start circuit ON. The master valve/p
3SpecicationsOperating Specications• Station Run Time: 1 minute to 6 hours on programs A, B, and C• Start Times: 4 per day, per program, for up
30Hidden FeaturesProgram CustomizationThe Pro-C is factory configured with 3 independent programs (A, B, C with four start times each) for different
31Programmable Sensor OverrideThe Pro-C allows the user to program the controller so that the sensor disables watering on only desired stations. For e
32Hidden Features (continued)Total Run Time CalculatorThe Pro-C keeps a running total of each program’s station run times. This feature provides a qui
33Hidden Features (continued)Solar Sync Delay for Pro-CThe delay feature is accessible only after the installation of the Solar Sync. The Solar Sync
34Hidden Features (continued)Cycle and SoakThe Cycle and Soak feature allows you to split a station’s run time into more usable, shorter watering dura
35Hidden Features (continued)Accessing the Soak Menu:Once the desired Cycle times for each station have been programmed, the Cycle time can be accesse
36Hidden Features (continued)Hunter Quick Check™This circuit diagnostic procedure is can quickly identify “shorts” commonly caused by faulty solenoids
37Troubleshooting GuideProblem Cause SolutionThe controller repeats itself or continuously waters, even when it should not be on (cycling repeatedly
38Troubleshooting Guide (continued)Problem Cause SolutionThe display reads “SENSOR OFF”. The rain sensor is interrupting irrigation or the sensor jump
39Certicate of Conformity to European DirectivesHunter Industries declares that the irrigation controller Model Pro-C complies with the standards of
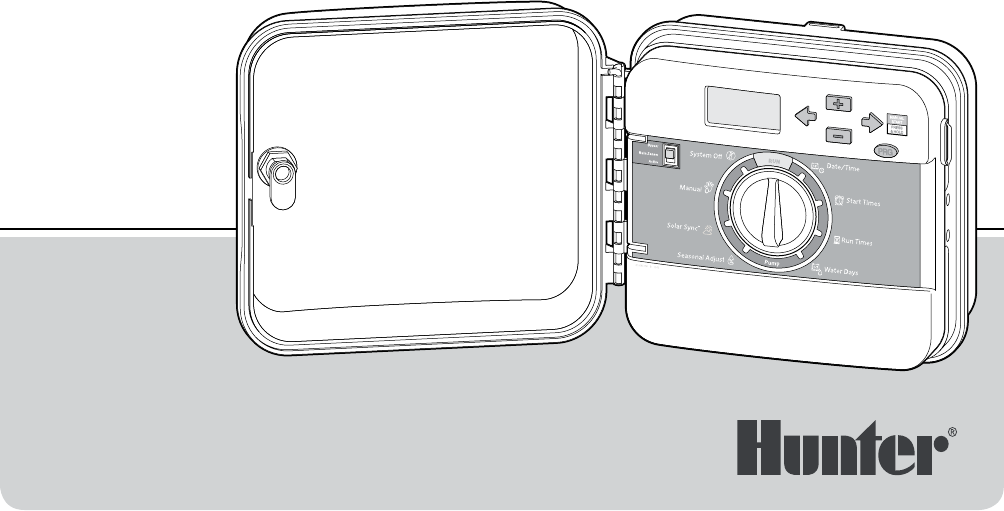
4Pro-C ComponentsAB Pro-C Components
HUNTER INDUSTRIES INCORPORATED | Built on Innovation®1940 Diamond Street, San Marcos, California 92078 USAwww.hunterindustries.com LIT-605_ENG 1
5Pro-C Components (continued)①Main DisplayIndicates various times, values, and programmed information②Year Identies current calendar year③Month Iden
6Pro-C Components (continued)D C
7Pro-C Components (continued)CControl Dial①RunNormal dial position for automatic operation②Set Current Date/TimeSet current date and time③Set Program
8Mounting the Controller to a WallAll necessary hardware is included for most installations.1. Use the hole at the top of the controller as a refere
9Connecting AC PowerIndoor CabinetRoute transformer cable through the hole on the bottom left side of the controller and connect one Yellow Wire to ea
Related products and manuals for Control panel Hunter PRO-C (PCC)
 (20 pages)
© 2020, manymanuals.com. All rights reserved. | 0.096 s |
 Manymanuals.com
 Manymanuals.de
 Manymanuals.fr
 Manymanuals.it
 Manymanuals.pl
 Manymanuals.cz
 Manymanuals.es
 Manymanuals-pt.com
Comments to this Manuals